You know how to update every app, don’t you? Android helps us update apps automatically as soon as it hits the Play Store too. But the same feature is a two-edged sword. Irrespective of the benefit, it burns your mobile data pack like a flash of the second and, you will feel the internet is slower than a herd of snails traveling through peanut butter.
Some third-party apps also inculcate the auto-download feature even if the native option is turned off.
So in this article, I am going to walk you through six solutions for automatic-apps-download dilemma.

Contents
Prevent Automatic Apps Downloads on Android
Several settings make your phone prone to automatic-app-install syndrome. So, let’s explore each of them one by one with the possible solutions.
#1. Change Google Play Store Setting
The Play Store is official app marketplace of Android. And, that’s why we are starting here.
Google Play Store has a native setting to enable automatic updating of apps which when activated, makes use of your connection (be it Wi-Fi or mobile data). So leaving your phone with enabled data may even end up in zero balance.
That’s why you should disable the Setting at least to prevent automatic downloads via the data connection.
Follow the steps given below to avoid automatic apps downloads on Android through Play Store.

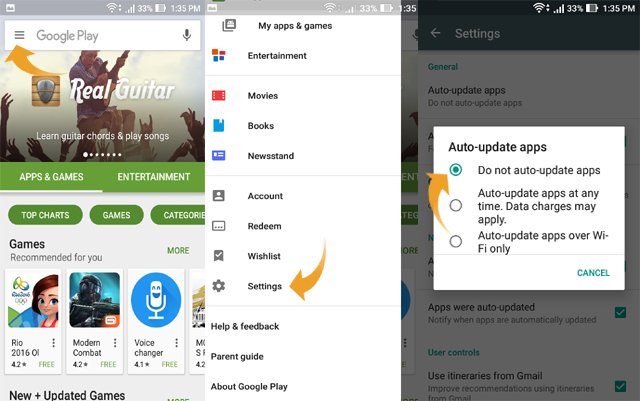
Step 1: Open Play Store on your Android phone and, tap on the three striped more options button given on the left-top portion of the screen.
Step 2: You will get many options here. Scroll down a bit to see the exact item we want, Settings. Don’t hesitate to open it.
Step 3: Under General, you get an option named Auto-update apps. Tap and choose Do not auto-update apps there.
That’s it. You will never see automatic apps download ever. In case you want to have update apps when connected to apps, either do it manually or choose Auto-update apps over Wi-Fi only from Step 3 (easy way).
About 85% of such issues get resolved here. If you feel it persists, check the following sections.
#2. Change Google Credentials
Have you installed Bluestacks on your PC?
Chances are you face the auto-download issue due to Bluestacks, which syncs the data with your smartphone. Uninstalling the software is not an ideal solution here because you may want to use it again on your computer.
So open Bluetacks and remove your Gmail account from it. For the assurance, you can change the password too. Google seeks a password confirmation in the background when a new install happens. Having a modified password blocks the authorization and it saves you.
#3. Use an App to Check App Extensions
Some apps install additional add-ons to ease your tasks. Maybe they are helpful but for a person who looks forward to ceasing the automatic app downloads, the extensions are huge pitfalls as it uses your data in the background.
You need to get yourselves deep into the active processes to get them. But an app called Addon Detector comes to your rescue here.
Install the app, open it and scan! That’s it, no big deal!
Addon Detector goes deep into the algorithm of every app and shows their true color. You may get surprised to see what permissions even a seem-to-be-nice app needs. The Notification Monitor feature aids you in controlling the notification area access of all the apps on your Android.
In my opinion, the best option is automatic addon detecting itself. You might have downloaded several extensions or addons within some apps (say a lock extension in a gallery app).
Addon Detector scans for all the add-ons and, gives you a detailed report on what they do so that, you can decide whether to keep them or not.
#4. Regulate Background Data Usage
How frustrating is it to have unwanted apps on your phone without your agreement?
Many a user has complained about the automatic downloading of some sponsored apps that they have no idea from where it came. If you also faced the same at least once on your smartphone, it’s mandatory to restrict background data usage for some apps.
First, pick up your phone and go to Settings. Under Wireless & Networks, you can see an option named, Data usage. Tap on it and scroll down to see the data using apps. Once you stumble on one which you think doesn’t need data connection, toggle Restrict app background data on.
#5. Have an Eye on the Recently Installed Launcher
All the four actions given above went in vain?? Then, the problem is most probably due to a launcher you installed recently (in case you don’t have a launcher app, move on to the next section).
You should uninstall the launcher and see how things are going on for a few days. (Yeah, third-party launchers also cause the issue).
Don’t worry! You will not have to download the launcher again if the problem is not with it. Just install APK Extractor and, take a backup of the app. The resultant APK file will help you reinstall the app without using the internet.
Follow Settings>> Apps, tap on the launcher app and hit Uninstall. There you go!
#6. Wipe Cache Partition {Apply only if You are on the Fence}
Haven’t you got out from the chaos yet? Then, wiping cache partition is the only practical choice left for you.
You must ensure the rest of the solutions in this list return zero results before tightening the belt to try this because wiping partition deletes some data Android use to for smooth functioning.
Of course, you may feel some clumsiness after the wipe. But it’s entirely worthy. And, you can follow the very same process of wiping the cache partition for other such issues (like Play Store related errors) that bewilder you.
Follow the steps given below to proceed to the process.
Step 1: Go to Settings app and select Backup & Reset under Personal.
Step 2: From the upcoming screen, Personal data reset will do the trick. So, tap on it.
Step 3: You will see here the type of data this option is going to erase. As you have made up your mind to go on, hit Reset device button on the bottom.
Step 4: Being case sensitive (because it deletes your personal data and downloaded apps), you have to enter a confirmation code. Do the same and press Erase everything.
Wait for a while to get the home screen after a few operations. Sure, the device will be rebooted!
Once it boots up, you will see the interface same as the time when you purchased the phone.
Wrapping Up
You have got six different fixes for apps auto-downloads on Android.
In case you are reading without having the issue, don’t forget to bookmark the post.
Make sure you spare a share.
Cheers. :)